
Client Onboarding Portal: How to Build One That Reduces Time-to-Value by 50%
Learn how to build a client onboarding portal that automates intake, collects documents, and gets clients to value faster. Step-by-step guide with examples and tool recommendations.
TL;DR: Learn how to build a client onboarding portal that automates intake, collects documents, and gets clients to value faster. Step-by-step guide with examples and tool recommendations.
You just closed a new client. Contracts are signed, everyone is excited, and then... silence. The kickoff email gets buried. The intake form goes unanswered for two weeks. Nobody knows who owns what. By the time you actually start doing the work, the client is already wondering if they made the right choice.
This is not a rare scenario. Studies show that professional services firms lose 10 to 20 percent of new clients within the first 90 days, and poor onboarding is the number one reason. The gap between "yes, let's do this" and "wow, this is working" is where relationships go to die.
The fix is not more emails or another kickoff call. It is a client onboarding portal — a single, branded space where every new client gets a structured, repeatable experience from day one.
I have spent the last two decades building B2B software, and I have seen onboarding done every possible way. In this guide, I will walk you through exactly what a client onboarding portal should include, show you real examples, and give you a step-by-step process for building one that cuts your time-to-value in half.
What Is a Client Onboarding Portal?
A client onboarding portal is a dedicated digital space where new clients complete every step needed to kick off a project or engagement. It handles intake forms, document collection, contract signing, introductions, and communication — all in one place.
It is different from a general client portal in a few important ways:
- Scope: A general client portal is an ongoing hub for deliverables, reporting, and communication. An onboarding portal is focused specifically on the first 30 to 90 days.
- Structure: Onboarding portals are linear and task-driven. They guide clients through a sequence of steps rather than presenting an open dashboard.
- Lifecycle: Some teams build onboarding as a section within their broader client portal. Others create a standalone experience that transitions into the main portal once onboarding is complete.
Think of it this way: your client portal is the house. The onboarding portal is the front door and the welcome mat.
Why You Need a Client Onboarding Portal
If you are running onboarding through email threads, shared Google Drives, and calendar invites, you are creating friction at the worst possible moment. Here are five problems a client onboarding portal solves.
1. Slow Intake
Without a structured process, gathering basic client information can take weeks. Emails get lost, forms go unfilled, and your team sits idle waiting for answers. An onboarding portal puts everything in one place with clear deadlines and automated reminders.
2. Missing Documents
"Can you resend that W-9?" "Where should I upload our brand guidelines?" "Did you get the signed NDA?" These questions eat hours every week. A portal with a dedicated document upload area eliminates the back-and-forth entirely.
3. Unclear Expectations
New clients often do not know what happens next. When is the first deliverable? Who is their main point of contact? What do they need to provide? An onboarding portal lays out the timeline, milestones, and responsibilities from the start.
4. Repeated Questions
Your team answers the same questions for every new client. "How do we share files?" "What are your working hours?" "How do revisions work?" A built-in knowledge base or FAQ section handles these questions before they are asked.
5. Inconsistent Experience
When onboarding lives in someone's head, quality varies depending on who runs it. A portal standardizes the experience so every client gets the same professional, organized start — regardless of which team member is managing the relationship.
What to Include in Your Client Onboarding Portal
A great onboarding portal is not complicated, but it is thorough. Here are eight components I recommend including.
1. Welcome Page with Branding
First impressions matter. Your onboarding portal should open with a branded welcome page that includes a personal greeting, a brief overview of what to expect, and a clear first step. This is also a good place for a short welcome video from the account lead or founder.
Keep it warm but practical. Something like: "Welcome to the team. Here is everything you need to get started. Complete the steps on the left side, and we will have your project kicked off within five business days."
2. Intake Forms and Questionnaires
This is the backbone of your onboarding portal. Intake forms collect the information your team needs to start working — business details, goals, preferences, access credentials, brand assets, and anything else specific to your service.
A few tips for effective intake forms:
- Break long questionnaires into sections so clients can save progress and return later
- Use conditional logic to show only relevant questions
- Include helper text or examples for complex questions
- Set a clear deadline for completion
3. Document Upload Area
Create a structured space for clients to upload required documents. Instead of a single "upload files here" button, organize it by document type: contracts, brand assets, financial documents, credentials, reference materials.
Label each upload area clearly and indicate which documents are required versus optional. Bonus points if you can show completion status so clients know exactly what is still outstanding.
4. E-Signatures for Contracts and NDAs
Do not make clients print, sign, scan, and email documents back. Embed e-signature workflows directly in your portal so clients can review and sign contracts, NDAs, scope of work documents, and other agreements without leaving the onboarding experience.
This single step can shave days off your onboarding timeline. The fewer tools a client has to juggle, the faster they move.
5. Project Timeline and Milestones
Show clients exactly what the next 30, 60, or 90 days look like. A visual timeline with key milestones helps set expectations and gives clients confidence that there is a plan.
Include milestones like:
- Onboarding kickoff
- Discovery and strategy phase
- First deliverable or prototype
- Review and feedback cycle
- Go-live or campaign launch
Tie milestones to dates when possible. Even rough estimates are better than nothing.
6. Team Introductions
Introduce every team member the client will interact with. Include names, roles, photos, and a sentence about what each person handles. This is especially important for agencies and consultancies where clients work with multiple specialists.
A simple team directory removes the "who do I talk to about X?" question before it comes up.
7. Knowledge Base and FAQ
Compile answers to every question clients typically ask in the first month. Group them by category: billing, communication, deliverables, tools, and processes.
Common questions to include:
- How do I request changes or revisions?
- What is the expected response time?
- How does billing and invoicing work?
- What tools or access do I need on my end?
- Who do I contact if there is an urgent issue?
A solid FAQ section reduces support tickets during onboarding by 30 to 40 percent in my experience.
8. Communication Channel
Give clients a clear, centralized place to ask questions and communicate with your team. This could be an embedded chat, a discussion thread, or a simple message board within the portal.
The key is keeping onboarding communication out of email. When questions and answers live inside the portal, nothing gets lost, and anyone on your team can pick up the thread.
Client Onboarding Portal Examples
Here are three examples showing how different businesses might structure their onboarding portals.
Agency Onboarding Portal
━━━━━━━━━━━━━━━━━━━━━━━━━━━━━━━━━━━
WELCOME TO [AGENCY NAME]
Your onboarding checklist (3 of 7 complete)
━━━━━━━━━━━━━━━━━━━━━━━━━━━━━━━━━━━

  ✅ 1. Welcome & Team Introductions
  ✅ 2. Sign Master Services Agreement
  ✅ 3. Complete Brand Questionnaire
  ⬜ 4. Upload Brand Assets (logos, fonts, etc.)
  ⬜ 5. Provide Platform Access & Credentials
  ⬜ 6. Review Project Timeline & Milestones
  ⬜ 7. Schedule Kickoff Call

━━━━━━━━━━━━━━━━━━━━━━━━━━━━━━━━━━━
  Document Center      Message Your Team
  FAQ & Resources      View Timeline
━━━━━━━━━━━━━━━━━━━━━━━━━━━━━━━━━━━
Accounting Firm Onboarding Portal
━━━━━━━━━━━━━━━━━━━━━━━━━━━━━━━━━━━
WELCOME TO [FIRM NAME]
New Client Setup (2 of 6 complete)
━━━━━━━━━━━━━━━━━━━━━━━━━━━━━━━━━━━

  ✅ 1. Sign Engagement Letter
  ✅ 2. Complete Business Information Form
  ⬜ 3. Upload Tax Documents & Prior Returns
  ⬜ 4. Provide Accounting Software Access
  ⬜ 5. Upload Corporate Documents (W-9, EIN)
  ⬜ 6. Review Service Timeline & Key Dates

━━━━━━━━━━━━━━━━━━━━━━━━━━━━━━━━━━━
  Secure Document Vault
  Required Documents Checklist
  Message Your Accountant
  Tax Deadlines & FAQ
━━━━━━━━━━━━━━━━━━━━━━━━━━━━━━━━━━━
SaaS Customer Onboarding Portal
━━━━━━━━━━━━━━━━━━━━━━━━━━━━━━━━━━━
WELCOME TO [PRODUCT NAME]
Getting started (1 of 5 complete)
━━━━━━━━━━━━━━━━━━━━━━━━━━━━━━━━━━━

  ✅ 1. Account Setup & Team Invitations
  ⬜ 2. Complete Configuration Questionnaire
  ⬜ 3. Import Your Data
  ⬜ 4. Watch Product Training Videos
  ⬜ 5. Schedule Implementation Call

━━━━━━━━━━━━━━━━━━━━━━━━━━━━━━━━━━━
  Video Tutorials      Knowledge Base
  Chat with Support    Setup Progress
  Success Milestones (30/60/90 day)
━━━━━━━━━━━━━━━━━━━━━━━━━━━━━━━━━━━
Each of these follows the same core pattern: a checklist-driven experience with supporting resources and a clear communication channel. The specific steps change based on the business, but the structure stays consistent.
How to Build a Client Onboarding Portal: Step by Step
Here is the process I recommend for building your first onboarding portal.
Step 1: Map Your Current Onboarding Process
Before you build anything, document what onboarding looks like today. List every email you send, every document you request, every question you ask, and every tool you use. Talk to your team and identify where things stall or break down.
You are looking for two things: the essential steps that must happen, and the friction points that slow everything down.
Step 2: Define Your Onboarding Stages
Group your onboarding tasks into three to five clear stages. A common framework is:
- Contract and setup — Signatures, billing, account creation
- Information gathering — Intake forms, questionnaires, document uploads
- Discovery and planning — Strategy sessions, timeline review, goal alignment
- Kickoff and handoff — Team introductions, first deliverable, transition to ongoing work
Each stage should have clear completion criteria so both you and the client know when to move forward.
Step 3: Create Your Content and Templates
Build out the actual content for your portal:
- Write your welcome message and record a welcome video
- Design your intake forms with the right questions
- Create document upload categories and labels
- Draft your FAQ and knowledge base articles
- Set up your project timeline template
- Prepare team bio pages
Spend extra time on your intake forms. The quality of information you collect here determines how smooth the rest of the engagement will be.
Step 4: Choose Your Platform
You need a tool that can host branded pages, collect form responses, handle file uploads, and manage communication. I will cover specific options in the next section, but the key requirements are:
- Custom branding (your logo, colors, domain)
- Form builder with conditional logic
- Secure document uploads
- Task tracking or checklist functionality
- Client-facing communication
- Automated reminders and notifications
Step 5: Build and Test with a Real Client
Do not try to make it perfect before launching. Build your portal, then run your next new client through it. Take notes on what works, what confuses them, and what they skip.
Ask for explicit feedback: "How was the onboarding experience? Was anything unclear? What would you improve?" Clients appreciate being asked, and their answers will make your portal significantly better.
Step 6: Automate and Iterate
Once you have validated your portal with a few clients, start automating:
- Trigger-based emails — Automatically send reminders when tasks are overdue
- Status notifications — Alert your team when a client completes a step
- Conditional content — Show different steps based on service tier or client type
- CRM integration — Sync onboarding status with your sales pipeline
Then keep iterating. Review your onboarding metrics quarterly and refine the experience based on data.
Tools for Building a Client Onboarding Portal
There are several options depending on your budget, technical ability, and specific needs.
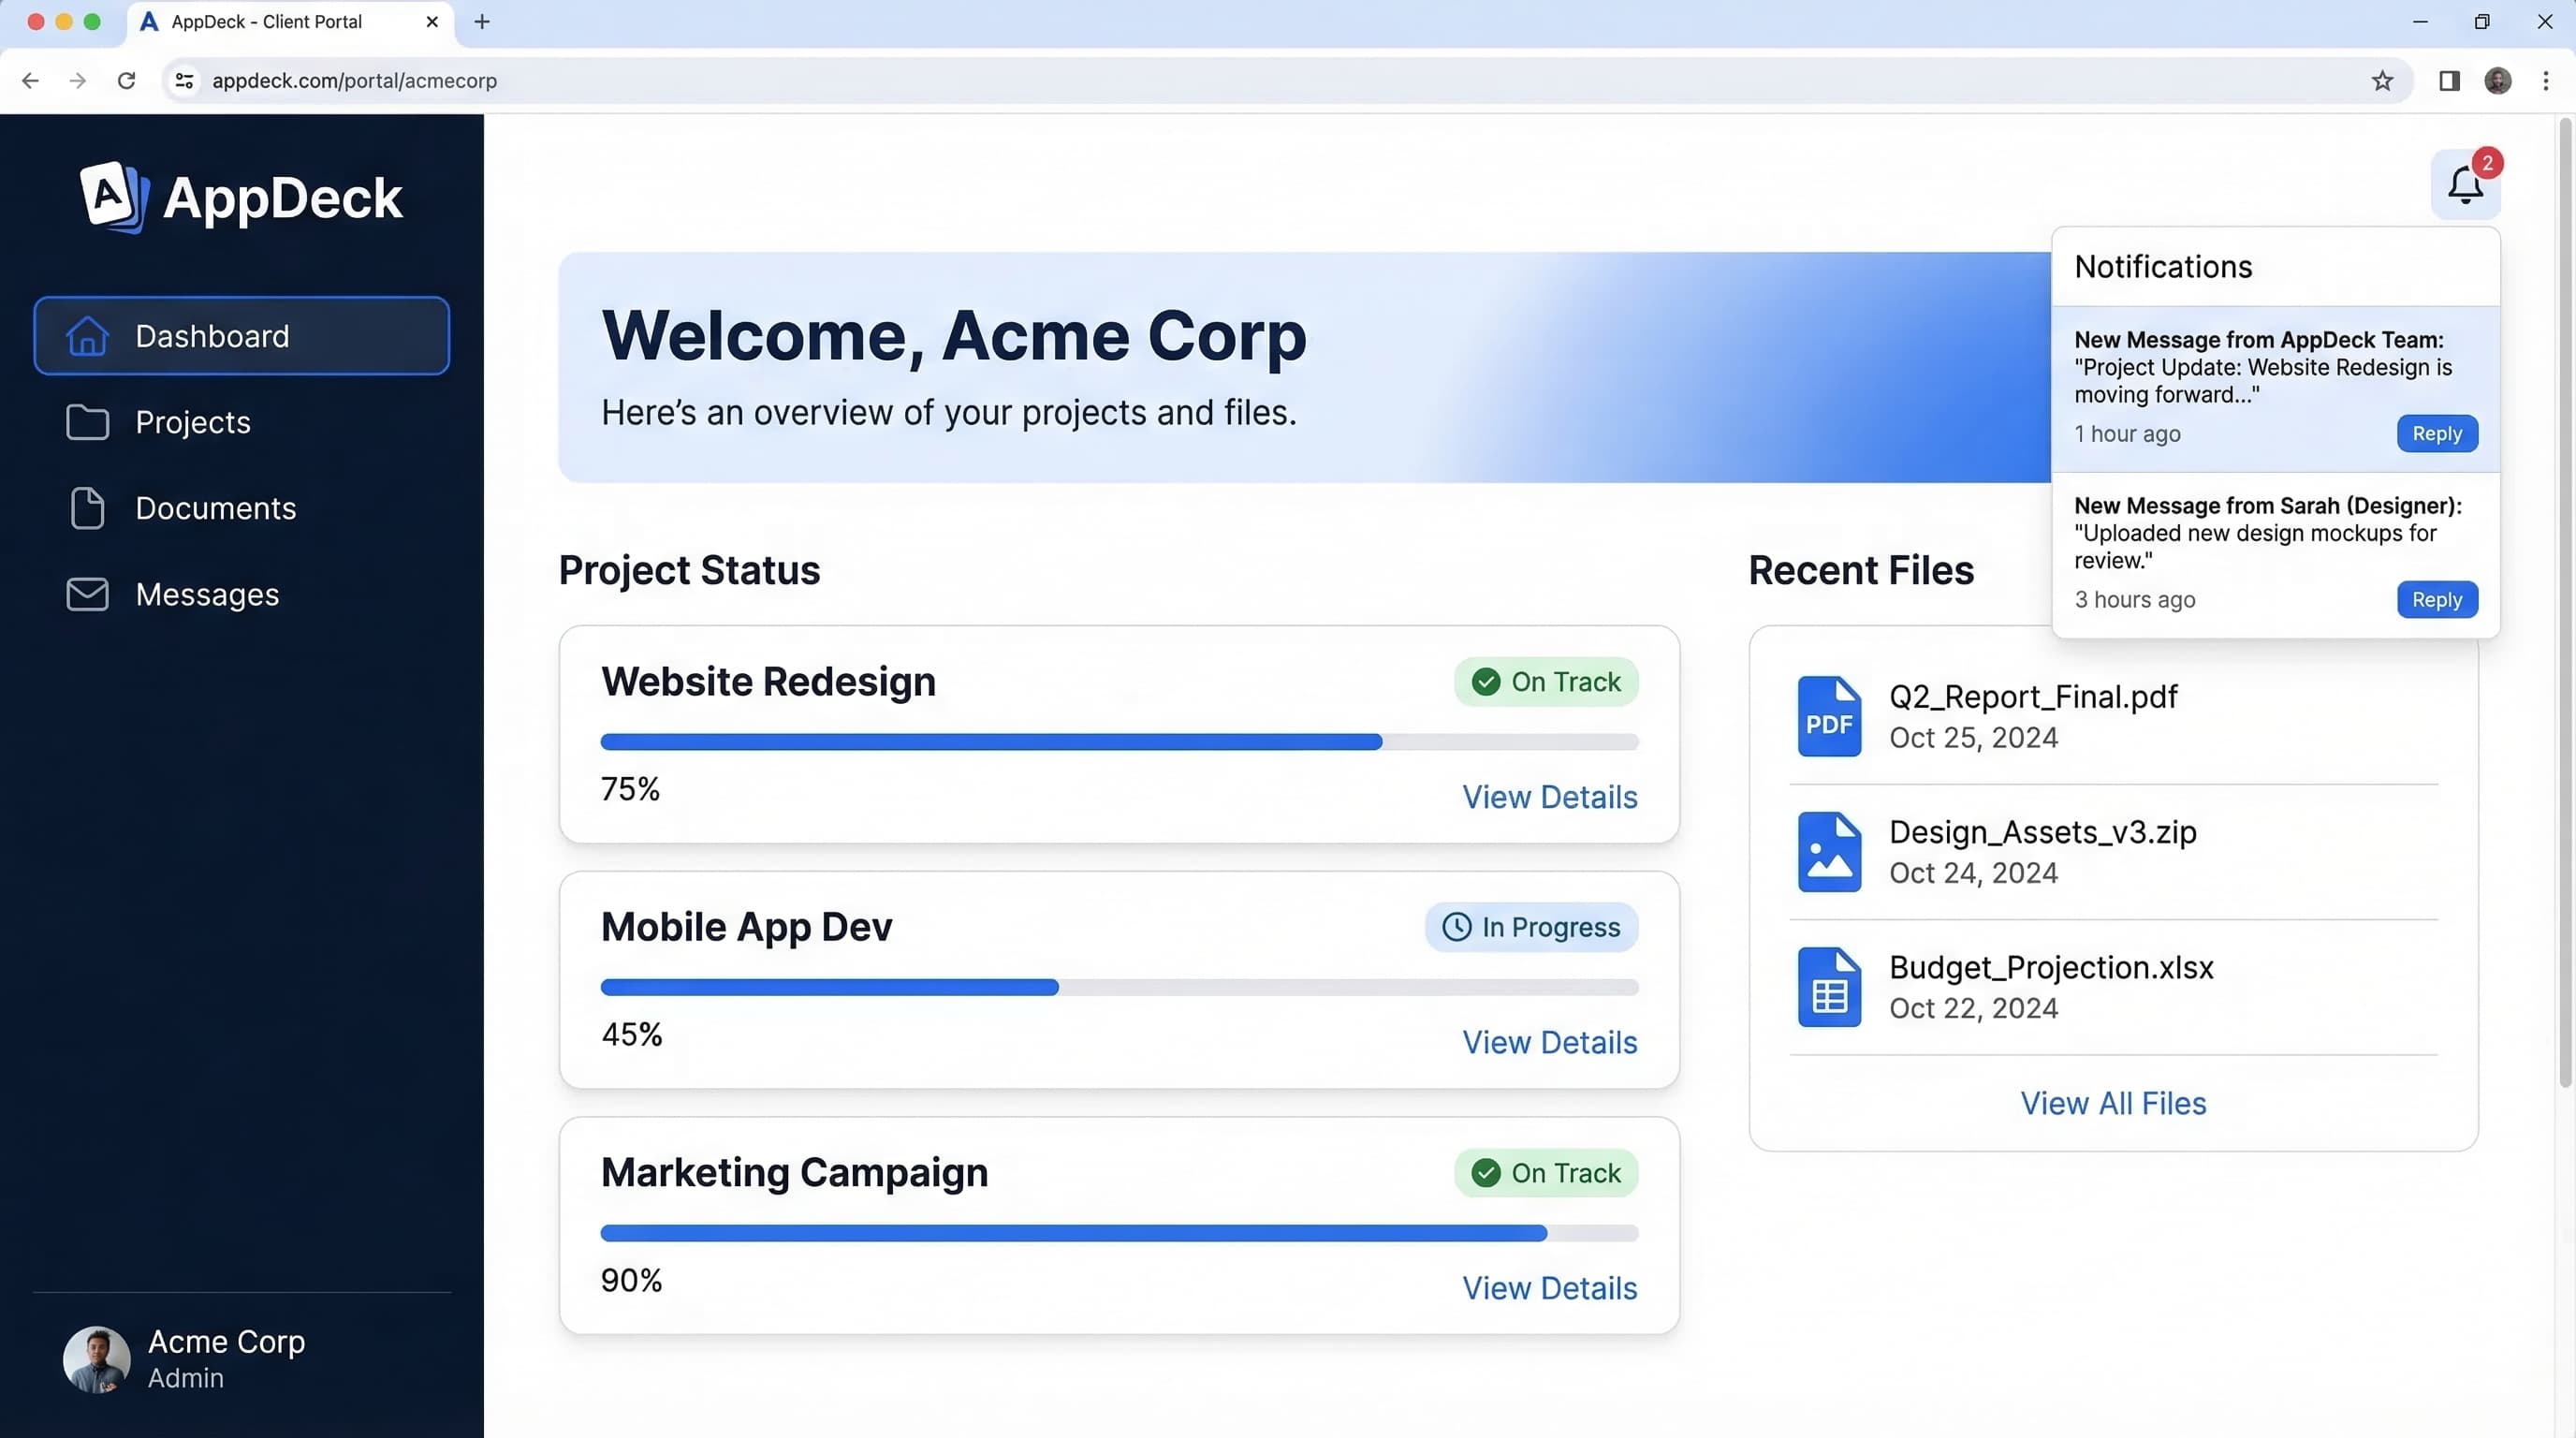
AppDeck is purpose-built for professional services teams that need branded client portals with onboarding workflows, document management, and team collaboration. If you want a dedicated client onboarding portal that transitions seamlessly into an ongoing client hub, it is worth a look. You can set up a fully branded portal in minutes without writing any code.
HoneyBook is popular with freelancers and small agencies. It combines proposals, contracts, invoicing, and basic client portals in one tool. Onboarding features are decent but limited in customization.
Dubsado offers more workflow automation than HoneyBook, with customizable forms, schedulers, and client portals. It works well for service businesses that need a CRM and portal in one package.
Monday.com provides flexible project management with client-facing views. You can build onboarding workflows using their board and form features, though it requires more setup and does not feel like a dedicated portal.
Notion is a budget-friendly option for teams that already use it internally. You can create client-facing onboarding pages with checklists, databases, and embedded forms. The downside is limited branding and no native e-signatures or document management.
The right choice depends on how much customization you need and whether you want onboarding as a standalone tool or part of a broader client portal platform.
Measuring Onboarding Success
Building a portal is only half the equation. You also need to measure whether it is working. Here are five KPIs to track.
1. Time to First Value
This is the most important metric. How many days pass between contract signing and the client seeing their first meaningful result? That might be a first deliverable, a launched campaign, a completed audit, or whatever "value" looks like in your business.
A good onboarding portal should cut this number by 40 to 50 percent. If your current time to first value is 30 days, aim for 15.
2. Document Collection Rate
What percentage of required documents are collected within your target timeframe? If clients are consistently stalling on document uploads, your portal might need better instructions, automated reminders, or a simpler upload process.
Target 90 percent or higher within the first two weeks.
3. Client Satisfaction Score
Send a brief survey at the end of onboarding. A simple "How would you rate your onboarding experience?" on a 1 to 10 scale gives you a baseline to improve against. Follow up with one open-ended question: "What could we improve?"
4. Onboarding Completion Rate
What percentage of clients complete every step in your onboarding portal? If completion rates are low, look at where clients are dropping off. There is usually one or two steps that cause disproportionate friction.
5. Support Tickets During Onboarding
Track how many questions or support requests come in during the first 30 days. A well-designed portal with a strong FAQ section should reduce these significantly compared to your pre-portal baseline.
Review these metrics monthly for the first quarter, then quarterly after that. Small improvements compound quickly — a 10 percent reduction in time-to-value each quarter adds up to a dramatically better client experience within a year.
Frequently Asked Questions
What is a client onboarding portal and how is it different from a regular client portal?
A client onboarding portal is a dedicated digital space focused specifically on the first 30 to 90 days of a new engagement. It handles intake forms, document collection, contracts, team introductions, and kickoff tasks in a linear, checklist-driven structure. A general client portal is the ongoing hub for deliverables, reporting, and communication once the relationship is live. Some teams build onboarding as a section within their broader client portal; others run a standalone onboarding experience that transitions into the main portal once the welcome phase is complete.
How long should client onboarding take with a portal in place?
Most professional services engagements should complete onboarding in 5 to 15 business days with a portal, down from 30 to 60 days with email-based onboarding. Time-to-first-value—the gap between contract signing and the client seeing meaningful results—is the better metric to track. A well-designed onboarding portal cuts time-to-first-value by 40 to 50 percent. If yours is currently 30 days, target 15. Speed comes from removing waiting time, not from rushing the work: parallel tasks, automated reminders, and fewer round-trip email exchanges.
What's the difference between using a dedicated onboarding portal versus tools like HoneyBook, Dubsado, or Notion?
HoneyBook and Dubsado bundle proposals, contracts, and basic portals together and work well for freelancers and small agencies, but customization and branding are limited. Notion is cheap and flexible but lacks native e-signatures, secure document management, and automated reminders. Dedicated portal platforms like AppDeck give you full white-label branding, conditional intake forms, structured document collection, and transition cleanly into an ongoing client hub. Choose based on whether onboarding is part of a broader CRM workflow (HoneyBook/Dubsado), a one-off knowledge structure (Notion), or a permanent client relationship hub (dedicated portal).
Which professional services firms benefit most from a client onboarding portal?
Any firm doing more than 5 to 10 new engagements per month sees clear ROI. Agencies, accounting firms, law firms, consultancies, and B2B SaaS implementation teams benefit the most because their onboarding requires multiple intake forms, document uploads, signatures, and stakeholder introductions. Solo freelancers with one or two new clients per quarter can usually get by with a templated email sequence. The threshold is repeatability: if you're answering the same five questions and requesting the same eight documents from every new client, a portal pays for itself within the first month.
When should you not use a separate onboarding portal?
Skip the standalone onboarding portal when your engagements are short (under 30 days), highly bespoke with no repeatable structure, or when you've already invested in a broader client portal that supports checklists and intake forms. For most firms with an existing client portal, the right move is adding an onboarding section inside it rather than running two separate logins. A standalone onboarding tool also doesn't make sense for one-time transactional services where the relationship ends at delivery—an email checklist will do the job without forcing the client to log in.
Wrapping Up
A client onboarding portal is one of the highest-leverage investments a professional services firm can make. It reduces churn, accelerates time-to-value, and creates a consistent, professional experience for every new client.
You do not need to build something complicated. Start with the basics — a welcome page, intake forms, document uploads, and a timeline — and iterate from there. The most important thing is replacing the scattered email-and-spreadsheet approach with a single, structured experience.
Your clients chose to work with you for a reason. A great onboarding portal makes sure they feel confident in that decision from day one.
Related Reading

Founder & CEO, AppDeck
Serial entrepreneur with 20+ years building B2B software companies. Former executive managing 2,800+ employees across three continents. Vik reviews all AppDeck content for accuracy and practical relevance.
Share this article
Explore Related Solutions
Related Articles
12 Client Portal Examples: Real Designs That Impress Clients
12 client portal examples from agencies, accounting firms, law firms, and consultants. See real portal designs with features, layouts, and what makes each one effective.
Client Portal Software for Agencies: Features, Pricing & Comparison (2026)
Compare the best client portal software for agencies. Features, pricing, and real reviews of top platforms to reduce status meetings and improve client communication.
Client Portal Software: 10 Best Platforms for 2026 (Complete Guide)
Compare the 10 best client portal software platforms for 2026. Features, pricing, and honest reviews for agencies, consultants, law firms, and professional services.